Tuesday, October 9, 2012

Banana Muffins...Banana & Pumpkin Muffins

Fall weather is FINALLY beginning to make an appearance here in so cal. The gloomy weather makes me want to craft, bake, organize, and light my vanilla and apple berry spice candles. ::sigh:: How I love the fall and winter months. No longer do I cringe at the thought of turning on the oven. My house smells like yummy fall candles and freshly baking banana muffins.

Banana eating is a phase in our household. Sometimes the whole bunch is eaten within a few days, other times they sit, and sit, and sit in the fruit basket. I hate tossing them, but alas they must go before the gnats start to populate my kitchen. Usually I have three or four bananas left... just enough to make one loaf of bread. Granted the loaf is easier to make than the muffins, but I feel that the muffins are cooked more thoroughly and I'm not left with a mushy-centered banana loaf. This time I had an entire bunch, 6 bananas, left. It was either bake or toss them, so I opted for a lot of baking today. I'm going to try freezing some of them to see if I can prolong their little muffin lives for a breakfast next week. I'll let you know how that works out.

Since I had so many bananas that were seeing their final day, I have not one, but two recipes to share with you today. I made a looooot of muffins.


The first recipe is for Banana Muffins. This recipe is in the Better Homes and Gardens Cookbook: mentioned in the sidebar of my blog. If you don't have access to this cookbook, here's the recipe:

Makes 1 loaf or 16 muffins.

2 cups all purpose flour
1 1/2 tsp baking powder
1/2 tsp baking soda
1/4 tsp salt
1/4 tsp ground cinnamon
1/8 tsp ground nutmeg
2 eggs, beaten
1 1/2 cups mashed banana (4-5 medium bananas)
1 cup sugar
1/2 cup cooking oil (I use canola.)
1/4 cup chopped walnuts. Optional. (I don't use them because I'm allergic.)

Preheat oven to 350F. Grease a cupcake/muffin tin. Set aside.

In a large bowl combine all dry ingredients (except sugar).
In another bowl combine eggs, sugar, and oil. Mix well. Add bananas.
Combine with dry ingredient mixture. Do NOT over mix. The batter should be lumpy.

Bake for 15-22 minutes or until a toothpick comes out clean.
If you use a loaf pan, bake for about 60+ minutes.
(When I was making the loaf, the top would almost burn before the middle was done cooking. If this happens, place some tin foil, loosely, over the top after about 45 to 60 minutes.)


Recipe 2: Banana Pumpkin Muffins
Here is the original recipe. I made some adjustments after I tasted the batter. Since it's very similar to the Banana Bread Muffins, I used the "seasoning" from that recipe in this one. Here are my ingredients along with the directions from Taste of Home (see link above). Some stuff I substituted or added because I didn't have what it called for.

Makes 16 muffins.

1 stick softened butter (1/2 cup)
1 1/2 cup sugar
3/4 cup mashed bananas (2 medium bananas)
1/2 cup canned pumpkin
1 tsp vanilla
1 3/4 cup all purpose flour
1 1/2 tsp baking powder
3/4 tsp baking soda
1 1/4 tsp cinnamon
1/4 tsp nutmeg
1/4 tsp salt (Originally 1/2 tsp, but if you use salted butter you need to adjust the salt)

In a large bowl, cream butter and sugar. Add eggs and beat well. Mix in bananas, pumpkin, and vanilla. 
In a separate bowl, mix dry ingredients.
Combine wet and dry mixtures.

Bake at 350F for 30-35 minutes or until toothpick comes out clean. Mine took 31 minutes.


Enjoy!

Wednesday, October 3, 2012

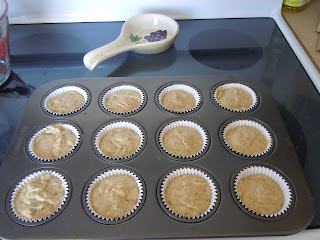
Zucchini Muffins... fail.

Again, I was browsing recipes online. I have a ton of cookbooks, yet using the internet for recipes is so wonderful. Add in the online hoarding boards, Pinterest, and a girl is sitting on just this side of heaven. The crafts, organization, recipes...I digress. Anywho, since I have already accumulated a hoarders dream worth of recipes on there I decided to start actually making them. This time I saw a recipe for Low Fat Chocolate Chip Zucchini Bread. Given the 'fail' status of my previous bread making adventures, I decided to make muffins instead. Also, I'm not sure how chocolate and zucchini would taste together, so I made some changes to the original recipe. If you are interested in trying chocolate and zucchini, you can find the original recipe here.

*** Keep in mind that I wrote ALL of this BEFORE I tasted the final product.

At first I didn't think I had enough zucchini. Turns out 1 medium sized zucchini produces about 1 1/2 cups shredded zucchini. SUCCESS! I grated it using a cheese grater. About half way through grating, I discovered that the 'small' grate was too small. Then I switched to the larger side and it produced much better shreds. Depending on how much zucchini crunch/taste you want, you can choose which shred works best for you. Here is the difference.


Recipe: 
From the original recipe I linked above, I omitted the chocolate chips, and added the spices and lemon zest. When I tasted the batter from the original one, it seemed a little bland.

Makes 12 Muffins

1 cup all purpose flour
1 cup white whole wheat flour (You can use 2 cups all purpose flour if you don't have wheat.)
1/2 cup unpacked light brown sugar
1 1/8 tsp baking soda
1/8 tsp ginger
1/4 tsp nutmeg
1/4 tsp allspice
1 tsp vanilla
1 large egg
2 tbsp butter, softened
1 cup 'no sugar added' apple sauce
1 1/2 cups loose, shredded zucchini
1 tbsp lemon zest

Preheat oven to 325F. 

Combine flour, baking soda, spices, and salt.
In a separate bowl, beat the egg. Then mix in sugar, vanilla, butter, apple sauce, zucchini, and lemon zest.
Add flour mixture to the wet mixture and stir gently until combined.

Pour mixture into muffin tin. I lined them with foil cupcake liners.


Bake at 325 for about 45 minutes, or until a toothpick comes out clean. Let cool and enjoy!

Final Product: 


They look delicious; however, they are still pretty bland. Earlier, while I was searching zucchini bread recipes, I wondered why they all had so much sugar. Now I understand. I also understand why there were chocolate chips in the original recipe. After I photographed and tasted these moist, slightly lemon flavored, bland muffins. I topped a few of them with chocolate chips while they were still warm. Also, not good. Especially if you add the lemon. 

Conclusion: While these look amazing, I think they are flavorless for the most part. I will not be making these again and I'll be finding a new place for bread recipes. I'm thinking Taste of Home or Betty Crocker or Martha Stewart. 


Banana Pumpkin Bread

I LOVE bananas and pumpkin flavored foods. So, when I saw this recipe I was super excited to try it. Half way through I realized that I didn't have any eggs. I couldn't be too upset because my dear hubby had made eggs and toast for both of us for breakfast. After a quick trip to the market, I returned to finish my bread.

After I sliced the loaf, I thought that it needed to be baked longer. It seemed like the bottom wasn't "bread-like", but still a little doughy. The center slices also seemed a little under cooked. The thing I couldn't understand was that the toothpick came out clean. (Yes, I did insert the tooth pick in a few different spots.) Today, when I was referring to the recipe I had discovered online, I noticed that the picture she took of her loaf looked similar to mine. It looks more dense on the bottom. If I made this again, I would probably make muffins. That way it could cook more thoroughly. For me, it was a little doughy, but the taste was still really yummy. Oh, I would also use less cloves. They were a little strong for me. Therefore, I'm placing this recipe in the 'to try again' section of my recipe box.


Here is the original recipe link.

Ingredients from Skinnytaste

  • Baking spray
  • 3/4 cup unbleached all purpose flour
  • 1/2 cup white whole wheat flour
  • 3/4 tsp baking soda
  • 1/2 tsp salt
  • 1 tsp cinnamon
  • 1/2 tsp ground cloves (I would use 1/4 tsp)
  • 1/2 tsp ground nutmeg
  • 3 very ripe medium bananas, mashed
  • 1/2 cup pureed pumpkin
  • 2 tbsp butter, softened
  • 1/2 cup light brown sugar, unpacked
  • 1 large egg white
  • 1 large egg
  • 1 tsp vanilla extract

Directions from Skinnytaste
Preheat oven to 325°. 

Grease a 9x5 inch loaf pan with baking spray.In a medium bowl, combine flour, baking soda, pumpkin spice and salt with a wire whisk. Set aside.
In a large bowl, cream butter and sugar with an electric mixer. Add egg whites, egg, bananas, pumpkin and vanilla, and beat at medium speed until thick. Scrape down sides of the bowl.Add flour mixture and nuts (if using), then blend at low speed until combined. Do not over mix.
Pour batter into loaf pan and bake on the center rack for 60 minutes, or until a toothpick inserted in the center comes out clean.
Let the pan cool at least 20 minutes, bread should be room temperature before slicing.

Tuesday, September 25, 2012

Frugality vs. Healthy Options

Over snacking and large portion sizes are my downfall when it comes to eating. I also enjoy soda...another downfall. I avoided the inner aisles at the market today, but it seems like the "good stuff" is way more expensive than the "tasty stuff". Why can't the good stuff be tasty? The answer to that question is still a work in progress; however, I'm busily working on recipes that are good AND tasty. "But I don't have time to prepare a healthy meal...", I can hear the excuses already. The good things in life take time, but there are ways to help yourself throughout the week if you are on the go or have a husband that leaves for work before 6:20 every day. Let me say that waking up to make a healthy breakfast and lunch is a daily challenge for me.

So, how can we not spend $$, make a quick healthy meal, and not spend forever preparing it? Yep, you guessed it, the answer to that one is also a work in progress; but, I've come across some things that work for me. Knowing where to purchase good produce for a cheaper price also comes in handy. I find that large chain markets are often almost double the price of a community grocery store. This community store I purchase produce from has a huge variety of produce and herbs for relatively cheap. Look through the weekly ads that are probably tossed without looking at most of the time.

In order to save money (and time in the morning when I'm half asleep and likely to lose a finger if I use a knife), I have prepackaged some snack items such as baby carrots and pb celery. Purchasing the larger bag of baby carrots, a bunch of celery, and a bag of apples is WAY cheaper than buying the prepackaged (with a ton of preservatives) versions of these items. It took about 20-30 minutes to get these three things done. I do prefer to slice the apples in the morning, but there are options for prepackaging those too.

Carrots: Purchase a 16oz bag of baby carrots (99 cents for me today). Place 10 carrots in each snack size bag, along with about 1 tbsp of water to keep them from drying out. This made a week's worth of carrot snacks (about 18 cents/day).

Peanut Butter Celery: Purchase a bunch of celery. Wash and slice the stalks into thirds or quarters. Fill with pb or cream cheese. Place 4-5 pieces in each snack bag. I didn't 'fill' all of the slices I cut because I didn't know how long they would last 'filled' in the fridge. The remainder of the pre-cut pieces, place in a quart size ziplock bag with 1-3 tbsp of water (depending on how much celery you have) to keep it from drying out.


Bagged Salad: Although this is super handy when you're in a hurry, does it really take that long to tear up or cut lettuce? Plus buying the romaine bunch is WAY cheaper than buying the bag of pre-sliced romaine AND it doesn't have that weird processed taste. Today I spent less than $1 on a bunch of romaine and 2 heads of iceburg lettuce. I chopped the romaine and put it in a gallon size ziplock. Ta-da! I give you bagged salad for about 33 cents (without the iceburg). 

Stew meat: Check to see if the larger piece of meat is cheaper. Today, I compared the pre-cut stew meat and the whole piece of meat, both the same size. It turned out that the larger piece was $1/lb less than the pre-cut package. For $1/lb I can cut it myself at home...so I did. 

Freezing: How I wish I had a larger freezer. Freeze the extra sauces that you aren't planning to use right away. Sometimes buying the bagged frozen veggies can be cheaper because they don't spoil so quickly. If you are one for chopping and freezing your own veggies, have at it, but I find that it's better for us if I stock up with the green beans, broccoli, carrots, and corn are on sale for 99 cents a bag. 

Granted the prep work takes a little bit longer, but when it's 5:30 in the morning and I'm trying to put together a lunch that doesn't consist of lays potato chips, pb crackers, and chocolate pudding, I am very happy that I did all of it when I was awake. With all of the snacks already made, all I have to do is put together a sandwich, or a salad, or portion out the dinner left overs, and put in some snacks. This takes 10 minutes or less and my husband isn't eating preservatives all day. 

Monday, September 24, 2012

Pumpkin Cookies with Chocolate

It is time to break out the Pampered Chef stone. ::sigh:: How I've missed you...

Along with the wonderful holiday season comes overly rich foods that can pack on the pounds... and I LOVE to bake. This poses a huge problem. Pun intended. I follow a blog called Skinnytaste. She has a ton of recipes that are lower in fat etc. Today I decided to try making her Pumpkin Spice Cookies. I had to alter the recipe because my keys are in my husband's car, which is miles away with him at work. Needless to say I had to make due with the ingredients that I had on hand because I didn't have buttermilk OR pumpkin pie spice.


Here is the recipe I used (Copied from Skinnytaste and changed with my substitutions.): For the original recipe click > Pumpkin Spice Cookies

  • 4 oz cream cheese, softened
  • 2 tbsp salted butter, softened (Original recipe calls for unsalted. Be sure to adjust salt elsewhere)
  • 3/4 cup brown sugar, packed
  • 1/4 cup sugar
  • 1 egg
  • 1/2 cup pumpkin puree (canned is fine)
  • 1/4 cup 1% buttermilk (Mix 1 cup 2% milk with 1 3/4 tsp cream of tartar. Then measure out 1/4 cup of mixture for recipe)
  • 1/2 tsp vanilla extract
  • 1 3/4 cup all purpose flour
  • 1/2 tsp pumpkin spice 
    • To make pumpkin pie spice mix 2 tsp ginger, 4 tsp cinnamon, 1 tsp allspice, and 1 tsp nutmeg. This makes way more than what you need for this recipe.
  • 1/2 tsp baking soda
  • 1/2 tsp salt
  • 1/4 tsp baking powder

For the chocolate glaze:
  • 1/4 cup confectioners' sugar
  • 1/2 tbsp unsweetened cocoa powder
  • 1/2 tbsp 2% milk
  • 1/8 tsp vanilla extract
  • pinch of salt

Directions: 

Preheat oven to 350°.

In a medium bowl, whip cream cheese, butter and sugars together until light and fluffy. Next add egg; beat well. Stir in pumpkin, buttermilk mixture and vanilla.

Combine flour, spice, baking soda, salt and baking powder; gradually add to pumpkin mixture.

Bake 15 minutes or until golden. 

For the glaze: Whisk confectioners' sugar, cocoa powder, milk, vanilla and salt in a bowl. 

Wednesday, September 19, 2012

Autumn...

Autumn...the beginning of my FAVORITE time of the year. The weather cools down (everywhere except California apparently) and sweaters and scarves and boots are publicly acceptable again. Cooking, baking, and crafts are abundant at the end of the year too! Unfortunately, it's been WAY to hot to bake anything. With fall quickly approaching I couldn't help myself. I went into storage and took out the few autumnal items I have and began the pilgrimage to the craft store to continue building my seasonal arsenal. Since I haven't lived in my own place for very long, it's taking some time to accumulate enough stuff to decorate. This year, I'm going to build my collection when the season ends by purchasing the clearanced fall items.

Blah, blah, blah you're thinking. Where are the crafts, the desserts, the savory, delectable dinners? They are coming! For now I have a few crafts that I've started working on.

Remember the burlap Christmas wreath? It has been updated throughout the year, but I did remember to take a few pictures for the Autumn wreath update. All I did was replace the winter picks with fall picks. I cut apart some of them so I could artistically arrange them around the form. The update was about $4. Not too shabby for a whole new look... AND I LOVE IT!


I have another wreath project in the works, but I'll save that for another blog since I only have the wreath form completed. :/


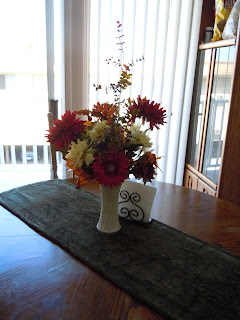
Aside from the wreath I have also updated my dining room table. Originally the stems I purchased were supposed to make up two vases worth of arrangements, buuuuut it ended up as one.

I suppose that is all for now. I'm browsing my recipes to see if there is anything I'm going to try for dinner. Stay tuned for another update. 


Friday, February 10, 2012

Paper Roll Craft

I actually, successfully, made a craft I found on Pinterest! ::gasp:: I'm just as shocked as you are. After browsing Pinterest and longing to have a house that I can do what I want with, I came back to reality and realized that I better start finding things to better my small, homey apartment. Although pinning that amazing fire pit, fantastic kitchen with tons of storage and a gas stove, innovative large house additions, and that oh so cute nursery (no, so don't bother asking). I decided to re-visit the boards on which I had compiled things I previously "liked". I began collecting toilet paper rolls right after I found this craft and have since been battling the bag in the hall closet. The one hundredth time it fell out of the closet must have been today. Since it was a wonderfully warm California day, I decided to sit on my un-pinterested balcony and get the craft crafted.

Here is the original.

Here is what I did and what you will need:
18 toilet paper rolls
Elmer's Glue-All Multi-Purpose Glue
Scissors
Black Spray Paint
Wax paper

1. Mark the rolls at 1 inch intervals. Luckily, my rolls were exactly 4 inches long. (Except the one I took a picture of.)

2. Fold (squish) the roll, preferably where you made the marks.

3. Cut along your marks.

4. Once you have all of the pieces cut, lay out wax paper. If you do it on regular paper, the glue will stick and then you have to cut your project away from the paper. Then lay out your design.

5. Glue where the pieces are touching. You may want to use clothes pins to hold the pieces together after putting them together. I didn't do this, but they seemed to stay just fine.

6. Wait 30 minutes to an hour, depending on what glue you used. Make sure you wait for the glue to dry before picking it up. Lay new wax paper before spray painting. (I used the same paper and didn't wait for the glue to completely finish drying and now I have to trim painted glue chunks from my piece.)

7. Spray paint, in a well ventilated area! Be sure to spray both sides. You will need more than 1 coat. 


8. Ta-da! I used a total of 72 pieces. It is almost 3 feet by 1 foot.


Since I'm not completely sure where I wanted to hang it, I had my hubby hold it up so you could see the finished piece clearly. 

What I learned: 
Next time I will do this on a table instead of the floor. My legs are killing me! 
Matte spray paint worked as a base coat, but I will be adding a black glossy coat. 
Toilet paper rolls have a swirl mark similar to how a package of crescent rolls opens. Try not to use those pieces since they do not have a smooth finish. 

Until the next craft...

Friday, February 3, 2012

My Newest Finds


Here are 2 new websites that I found yesterday and am excited to try. I'm still exploring them, but so far I like what I've found. Check em' out!

Ziplist This website is very versatile, although I don't have a smart phone I still like it. You can check off ingredients to add to a digital shopping list (yes, there's an app for that), browse recipes from tons of sites - that's how I found the following link, add recipes to a box, AND even "check" to add them to your digital grocery list. Also, create a sensible stockpile of things you always need on hand, use the grocery list template, create lists based on what store you need to get the items from, and my favorite part.... coupons! (It's not the coupon mecca, but I printed some good stuff yesterday.) I'm still exploring this website and trying to figure out how to completely use it, but so far so good.

Skinny Taste I found LOTS of new recipes that I want to try. There are pages upon pages of yummy things to try. On a diet? You can search for recipes based on Weight Watchers Points, Gluten Free, Vegan, Vegetarian, Holidays, Meat, and type of meal. Like Ziplist, you can also add things to a recipe box or grocery list. My favorite part of this website is that it gives you the nutritional information and has lots of pictures to show you each step. (Maybe I should think about taking more step-by-step pictures.)

Til I browse again...

Cheesy Chicken and Rice Bake / Blueberry Cookies

I have had this dinner recipe for weeks now. Every time I go to the market, there is always one ingredient that I forget to get. Finally, I made it a point to write the recipe on the back of my grocery list. Over the last few years, I've mostly been way too busy to try new recipes, especially those that took longer than 20 minutes. After getting home from a 12 hour day at 8pm who really wants to cook? It definitely wasn't me... and it wasn't that I didn't want to cook, I was just exhausted, and stopping at a local drive through was just easier. Now that I have plenty of free time to browse my favorite recipe sites, I'm finding that there are tons of recipes that I could have made ahead of time to save money, time, and I'll actually know what ingredients I'm putting into my body. (Taking a health class and watching Dr. Oz really makes you think about the things you consume.) I definitely check the labels of everything I purchase now. Granted, grocery prep and shopping takes more time now that I have detailed grocery lists, coupons, sales, and label checking to do. However, it is completely worth it, especially when I can get dijon mustard for 19 cents and save almost 50% on my grocery bills.

Cheesy Chicken and Rice Bake (Original Recipe)
Actual Prep Time: 1 hour+; Cook Time: 25 minutes
The reason the prep time is so long is because the brown rice takes about 1 hr 45 minutes in the rice cooker. If you purchase pre-cooked rice, and have pre-cooked chicken on hand, the prep will only be about 15 minutes.

8 Cooked and Diced Boneless Chicken Tenderloins (about 2 cups)
3 cups cooked brown rice
1 cup frozen corn
15 oz Pinto Beans drained and rinsed
1 cup sour cream (This was too much! 1/2 to 3/4 cup will be much better)
4 oz can fluid green chilies (I used Ortega Fire Roasted Diced Green Chilies)
3/4 cup salsa (I used Pace - Medium)
3/4 cup mexican blend shredded cheese plus a little more for on top.

Directions:
Preheat oven to 350F. In a large bowl, combine all ingredients. Bake for 25 minutes.

What I learned: Next time, I'll use 4 cups rice and less sour cream. It tasted good and I ate it with a flour tortilla, but for someone that doesn't prefer the taste of sour cream (my hubby), use less. Increasing the salsa was a good choice I made. I'm debating on possibly adding some fresh or canned diced tomatoes too.
**** If you make this, I'd love to hear how it comes out with the adjustments.

Blueberry Cookies (Original Recipe)
I followed original recipe almost exactly this time.

3/4 cup butter, softened (original called for margarine)
1 cup sugar
2 eggs
1 1/2 tsp fresh grated lemon rind
1 tsp vanilla extract
2 cups all-purpose flour
2 tsp baking powder
1/4 tsp salt
1/2 cup milk (I used 2%)
1 cup fresh blueberries
Directions:
"In a mixing bowl, beat margarine and sugar until fluffy texture.Add eggs, lemon rind, and vanilla; beat until combined.
In another bowl, add the flour, baking powder, and salt; stir to combine. Beat flour mixture into creamed mixture alternately with milk. Fold in the berries. Drop dough by teaspoonfuls onto a greased cookie sheet. Bake at 375° for 10-12 minutes. Transfer cookies to a wire rack to cool. Makes approximately 2 1/2 dozen." I got about 3 1/2 dozen cookies.


That's all for today folks.

Thursday, February 2, 2012

Dutch Potatoes

This is one of my favorite things to make. To me, this is comfort food. It can be used as a side dish, or the main course. My grandparents used to make this quite often and there are many different renditions of the recipe. (I may make them in the next few weeks.) Granted it's not exactly the same because the produce they used was straight from their garden, but I think this is pretty good too. Originally it's made with uncooked butter lettuce and hand-cut diced bacon (from a block not strips). My modified version includes kale and kielbasa. Since my hubby is a carnivore, I needed to add more meat into the mixture. I certainly miss my grandma AND grandpa's cooking, but since one is no longer here and the other doesn't remember how to cook :( I must try to carry on the traditional foods that I grew up on. Soon, I will add more of their recipes that I have recently learned.

Recipe: Dutch Potatoes
Takes about 1 hour.
12 potatoes peeled and cut (about 7 cups)
4 hard boiled eggs diced
     Only use 1 or 2 yolks
1-2 cups Kale
4-5 tbsp mayo (to make it more creamy, add more mayo)
3 tbsp yellow mustard
1/2 - 1 tbsp white vinegar (I used 1tbsp because I prefer it to taste tangy)
1 (13oz) package Hillshire Farm Beef Lil' Smokies cut into thirds OR 1/2 kielbasa rope sausage cubed

Boil the potatoes as if you were just going to make mashed potatoes. I usually toss the eggs in with the potatoes to cook.
Boil or steam the kale. Once cooked, you will have about 1/2 the volume of what you started with.
In a skillet, cook the Lil' Smokies until some get the "grilled crust" on them. Drain on newspaper or paper towel.

When everything is done cooking and drained, mash the potatoes with mayo, mustard, and vinegar. Then add the kale and mash again. Last, add the eggs and Lil' Smokies, and do NOT mash or the eggs will disappear into the mixture. Simply fold the eggs and meat in with a spoon. THAT'S IT!


Sunday, January 29, 2012

Super Mario Themed Cupcakes

After weeks of planning and scouting numerous Pinterest entries, Google images, and blogs, Corey finally found some pictures of Super Mario themed cupcakes to make for the baby shower she was hosting. For such a prominent theme, one would think there would be WAY more options; unfortunately, there were not (unless you are a professional fondant and frosting crafter). There is no special recipe for the cupcakes: simply Betty Crocker Yellow Cake mix.

Supply List:
Round Icing Tip and bag
Yellow Cake Mix
Vanilla Frosting
Blue colored sugar (simply add blue food coloring to a few tbsp of sugar, and mix)
Pre-made fondant (blue, red, yellow, green)
Star shaped cookie cutter
Various round caps to cut out circular shapes
Toothpicks


Thursday, January 26, 2012

Not So Stuffed Peppers

If my memory serves me correctly, stuffed peppers was the first "real" recipe that I made. About eight to ten years ago my Spanish teacher gave us an assignment to make a Spanish themed dish, take pictures, etc. etc. Granted, I made a different dish (chimichangas) for the project, I discovered this recipe while I was researching. Still bearing the scar on my wrist from the oven burn I received when I removed the tray, I enjoy making and eating this wonderfully delicious dish. The first time I made this I followed the recipe to a tee, which I no longer have written but committed to memory. After everyone was finished eating, I noticed something: half of all of the bell peppers were left on the plate. "It's too much pepper," was the response I received. Which brings me to my 'Not So Stuffed Peppers' recipe. This casserole version is much easier to make, requires less peppers, and less pepper waste.
Writing this recipe was difficult, since I usually make this dish by sight/taste. Here goes...

Not So Stuffed Peppers:
Total prep and cooking time is about 1 hour. You can make the sauce/meat portion prior. Then just mix in the rice and bake.
2 cups cooked white rice
2-3 green bell peppers sliced (about 1-2 inches)
ground beef of turkey (I used about 3/4 cup cooked ground beef. If you really like meat, add more.)
1/2 tbsp minced onion
1/2 tsp basil
1/2 tsp oregano
1/2 tsp thyme
OR in lieu of basil, oregano, thyme use apx. 1- 1 1/2 tsp italian seasoning
1/4 tsp salt
1 can (14.5 oz) peeled diced tomatoes
1 1/2 cans (14.5 oz) tomato sauce (I used 3/4 of a 29 oz can.)
1 tbsp brown sugar (reduces the acidity of the tomatoes)
1/4 cup mexican style cheese blend.

1. Cook the white rice. Remember 2 cups water for every 1 cup of rice. Luckily, I have a rice cooker so I don't have to watch it too closely. Set aside.
2. Slice the bell peppers. Lay the sliced peppers in a 9x13 baking dish and add a little olive oil. Remember to grease the pan. Bake at 375 for about 10-15 minutes. Uncooked peppers can add a bitter taste to the casserole. See picture below.
3. In a skillet, brown ground beef with minced onion, basil, oregano, thyme, and/or italian seasoning, and salt.
4. Once ground beef is done, add diced tomatoes, tomato sauce, and brown sugar. Simmer for about 15 minutes.
5. Mix tomato sauce mixture with the white rice. Spread over cooked peppers. Sprinkle with cheese. Bake at 375 for about 10 minutes, or until cheese is melted. If you want to bake it longer, cover with foil so it doesn't dry out.

I ended up adding an additional 1/4 tsp of italian seasoning because it didn't quite taste right. :)


Wednesday, January 25, 2012

Christmas Craft

Here we are again. Another day, another recipe. Unfortunately, everyone knows the recipe for grilled cheese (that's what we had last night), so I'm going to share a crafty Christmas project.

This first piece of crafty genius was of course discovered on Pinterest. Before Christmas, Corey wanted to make burlap wreaths. After some persuasion, I was in. We ventured to the fabric store, the craft store, bought a lot of burlap and Christmas accessories, grabbed the scissors, and went to work. Now, if you are a neat freak I highly recommend that you do not do this in the house. The burlap threads end up EVERYWHERE. My friend had to vacuum me. True story. Anyway back to the wreath.

You need:
Scissors, foam wreath form, burlap, ribbon, and some decorations with a wire stem.

Directions:
Cut burlap into 1-2 inch wide strips, depending on how you want the final "look". Note: The thicker the strip, the harder it is for the tie to stay tied. I used about 1 to 1.5 inch wide strips
Once you have the width properly cut, you'll need to cut the length. I cut my strips to be about 12 inches long. You want to have it long enough to tie and have at least a 3 inch piece left on each side of the tied part.
Then tie each piece of burlap to the wreath form, overlapping slightly to avoid gaps.
The rest is pretty self explanatory, but if you need more direction please let me know and I'd be happy to help.


Tuesday, January 24, 2012

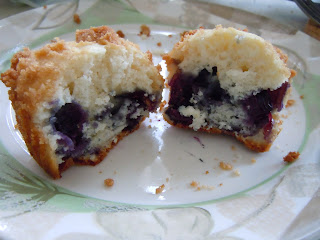
Blueberry Muffins

During a quick shopping trip with my sister to the 99 Cent Store for some cleaning supplies, I ventured into the produce section. Now, before you think that they don't have yummy, un-expired things there, believe me when I tell you they do. I discovered their produce when I was throwing a bridal shower. After returning home from Costco with a large fruit tray that was over priced, I realized that there was not enough of the fruits that most people enjoyed i.e., grapes and strawberries. A relative recommended that I try the 99 Cent Store. With some hesitation I went and purchased the above mentioned fruits and headed over to the bridal shower. At the end of the shower, to my surprise, the fruits I had purchased at a "discount" were completely gone, and the platter I over paid for was still half full. So, lesson learned, discount doesn't always mean expired or that no one wanted to eat them in the first place.

What does this have to do with blueberry muffins? Well, back to my quick shopping trip at the 99. As I wandered the produce section, I came upon blueberries. They looked fresh, smelled great, and my favorite part was that they were, of course, 99 cents each. (Compared to the 1.99+ that the regular super markets charge, I figured that was great.) Couldn't hurt to try them, so I bought 2 packages. After scouring Pinterest, Martha Stewart.com, and all of my cookbooks, I came up with two options: blueberry buckle and blueberry muffins. My wonderful Better Homes and Gardens Cookbook (see details on the side bar) also lists the nutrition info for each recipe. The muffins won because they had less than half the fat, calories, and sugar content of the buckle. Here's what you've all been waiting for, drum roll please!

Blueberry Muffin Recipe - Better Homes and Gardens
Makes 12 muffins and total prep and bake time is about 30 minutes.
1 3/4 cup all purpose flour
1/3 cup sugar
2 tsp baking powder
1/4 tsp salt
1 egg
3/4 cup milk (I used 2%)
1/4 cup cooking oil (I used Canola)
3/4 cup fresh or frozen blueberries
1 tsp finely shredded lemon peel into batter
1 recipe Streusel Topping (Recipe to follow)

Preheat oven to 400 F. Grease or line a muffin tray.
In a medium bowl combine flour, sugar, baking powder, lemon peel, and salt.
In another bowl combine egg, milk, and oil. Add egg mixture all at once to the flour mixture. Stir just until moistened (batter should be a little lumpy).
Fold in blueberries.
Spoon the mixture into the muffin pan about 3/4 full.
Add about 1 tbsp of Streusel Topping to the top of each muffin.
Bake 18-20 minutes at 400 F

Streusel Topping Recipe -
In a small bowl, stir together 3 tbsp all purpose flour, 3 tbsp packed brown sugar, and 1/4 tsp ground cinnamon. Cut in 2 tbsp butter until the mixture resembles coarse crumbs. Optional: Add in 2 tbsp pecans or walnuts (I didn't add nuts.)
A pastry blender worked great to get the "coarse crumb" look, but a fork would also work. It takes 5-10 minutes of mixing to get the butter small enough. DO NOT melt the butter first.

What I learned from this?? Previously, when a recipe called for a small amount of lemon (or another citrus) zest, I simply omitted it because I either didn't have the lemon or the zester. (Note: A cheese grater works great.) After eating these delicious muffins, I will never again leave out the lemon peel/zest. It added such a wonderful flavor to the muffins, that was not overpowering.


Monday, January 23, 2012

Jeff's Corn Salsa

While browsing one of my favorite sites, Pinterest, I came across a link to "Chipotle's secret recipes".
"It's too good to be true," I thought. For some of the recipes, including the steak marinade, it was too good to be true. After tasting the steak that we marinated in this concoction, I was glad I didn't smother it on everything.  I digress. The corn salsa doesn't taste exactly like the amazing Chipotle corn salsa, but it tastes pretty delicious, especially on tacos. YUM!

Before I write out the recipe, a word of caution. Do NOT make this in a metal bowl. How do I know this? We made it in a metal bowl and it turned out to be really bitter and we ended up tossing it out.

(Here is the Original recipe that we found: Chipotle Corn Salsa Recipe. Then there was a modified version based on that one which used frozen corn. Simply put- Don't use frozen corn.)

Jeff's Corn Salsa: 
6 ears roasted corn on the cob (removed from the cob of course)
    - First, soak the ears in water for 1-2 hours. Then, with the husks still on, roast on the bbq or in the oven u   until the husks become brownish.
1/3 bunch of cilantro finely chopped
2 green jalapenos finely chopped (if you want a spicier salsa, add more jalapenos and/or seeds)
1/4 of a red onion finely chopped
Juice of 1 lime
Salt and pepper to taste (we used about 1/2 tsp salt and 1/8 tsp pepper)
1 roasted poblano pepper, finely chopped. (Grocery stores often call this a pasilla pepper, which is what we used.)
    - Roast the poblano in the over on 350 degrees F for about 15 minutes. The waxy coating on the pepper should be peeling back. Once the pepper cools, peel off the waxy coating and chop the pepper.
After tasting and re-tasting this last night we could not figure out what we had forgotten. As I was writing this recipe out for you, I realized it was missing the cilantro. I better go add some now.

Farewell!


Finding the Perfect Curry

I found a wonderful recipe for Curry chicken a few months ago while I was searching for something different to make for dinner. Since I had never made curry before I assumed that most supermarket brand curry powders were the same: I was soon proven horribly wrong. As I browsed the aisles of Ralphs, I came upon a small tin of "curry powder". Excited to try it, I bought it, went home, looked up a recipe, and started whisking away at the ingredients in the pan. As most cooks do, I tried it. I nearly gagged. It was sooooo bitter tasting. This did not taste like the curry powder that my grandmother or mother used. Set on finding the perfect curry powder, I inspected both of their pantries. For weeks I scoured the grocery stores, to no avail. I had given up on finding this illusive powder. THEN while shopping for ingredients for a new steak marinade, I came across a new curry powder. This was THE powder and it was half the price of the previous one I purchased. So, here is the recipe.

Curry Sauce- Unfortunately the link to where I found the recipe is no longer available.
In a small sauce pan, whisk together the following:
2 tbsp butter
2 tbsp flour
1/4 tsp salt
1 tsp curry - I used Sadaf Curry Powder Mild (the original recipe called for 1/4 tsp, but it was not "curry" enough for our liking)
1/8 tsp salt
1 cup milk (you can also use coconut milk)

Cook on low to medium heat until sauce thickens. Stir often or the milk will burn to the bottom of your pan.

I put it over basmati rice, chicken breast, potatoes, and carrots.


Friday, January 20, 2012

The beginning...

I suppose I should begin by explaining my reasoning for beginning a blog. While drinking my delicious cup of hot tea and contemplating the possible consumption of a fudgesicle, I was reflecting upon various conversations I've had with friends lately: conversations about being married, life's exciting events, as well as the hardships that are being anticipated, cooking, cleaning, trying new things, and much more. These conversations have prompted me to show how an average girl like me can rival the likes of the Martha Stewart types.

I am blessed with two parents who encourage me to try everything. Naively, I assumed the parents of most of my friends encouraged the same behavior. I was wrong. Whenever I think, "there is NO way I will be able to do that" or "I can't do that; I've never done it before", I hear my dad's voice in the back of my mind remind me... What's the worst that could happen? or If you mess up, buy another bag of flour (piece of wood, different paint color, etc.). As a child I was able to try so many new things. I particularly remember building or helping my dad with house repairs. He wanted me to measure the space for the new board, measure the new board, mark it, and help him cut it. Immediately I gave him a million and one reasons why I couldn't accomplish the task. What if I measure wrong? What if I mark the board in the wrong place? We don't have another piece of wood. Instead of doing it himself, he replied with, "So what? If you measure wrong, we'll re-mark it. If it's cut too long, we'll trim it. If it's too short, we'll go buy another piece of wood." Moments like these have shaped me into the independent, diy woman I am today. 

Now that I have a little background out of the way, I can continue. After posting pictures of things I've made online, and receiving lovely responses from friends (That's pinterest worthy, what's the recipe, that looks delicious!), I've decided to compile my creations in one area. Whether or not I stick to writing and posting them is another story. Here are my disclaimers: 1. Not everything tastes as good as it looks. 2. Some things taste better than they look. 3. I don't come up with my own recipes, but I do add/modify/leave out some ingredients. I will give credit for where I got the recipe if it has an "owner". 4. This is about trying new things. If I mess up, I'll post the pictures anyways. 

For now I bid you farewell.